30×36 Small Original Art Tutorial
Purchase your stretcher bars from any art supply store or most craft stores such as Michael’s or Hobby Lobby. For most paintings you will require (2) 30″ bars and (2) 36″ bars. The small “Tree of Life” image requires (4) 30″ bars. Watch the video to see how to attach your artwork to the frame.
Full Size Original Art Tutorial
Below are simple instructions on how to properly mount your new artwork.
If you are building a frame for Mike at an event you are on the wrong page. Please Click Here
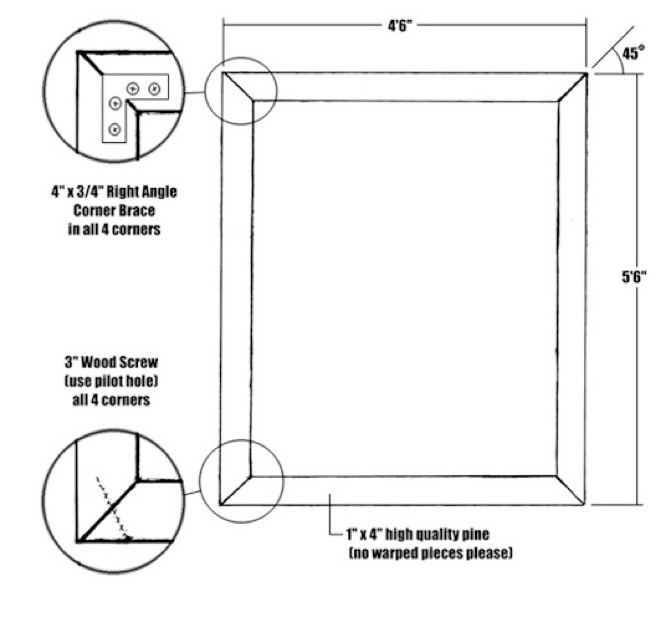
If you are building a frame for a “Tree of Life” Painting be sure to build a square frame that is 4’6″x4’6″.
1. Build the Frame
The First thing you will need to do is build a frame to stretch the canvas on. If you are not an experienced carpenter don’t worry, this is very easy to build with a few common tools.
You have two frame size choices, keep reading for more details.
TIP
These dimensions are the exact dimensions of the frame that your painting was originally painted on.
If you want to insure a perfect fit we recommend subtracting 2″ to 3″ from each side. Your new frame size will be approx 4’4″ by 5’4″ but you will be guaranteed not to have any unpainted canvas creeping onto the front due to minor discrepancies between the old and new frames sizes or angles.
Also the paintings present much more nicely with the artwork continuing onto the side.
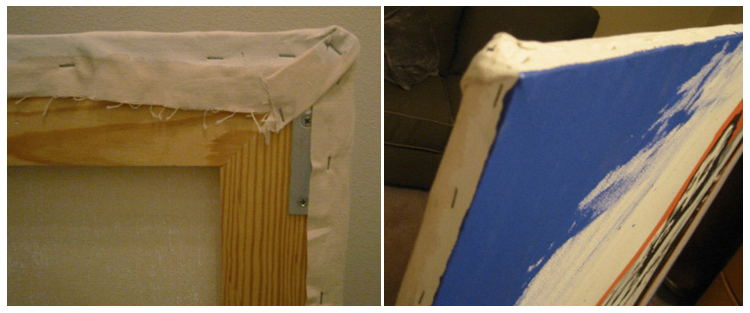
Double Fastened System:
Each corner has two fasteners:
- 4″ corner brace (or largest available up to 6″)
- 3″ wood screw (the 3″ wood screws are often accidentally overlooked) Use a pilot hole for the wood screw.
Tip! – The pilot holes are most easily drilled prior to frames assembly.
Additional Materials Needed:
- box of 1/4″ Arrow T50 staples (see picture below)
- Handheld Stapler
- Chairs that you can stand on. Usually folding chairs work well.
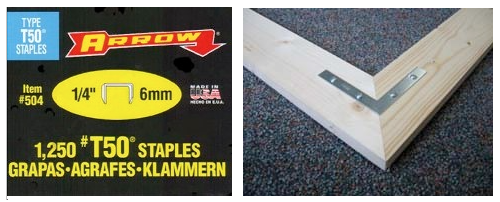
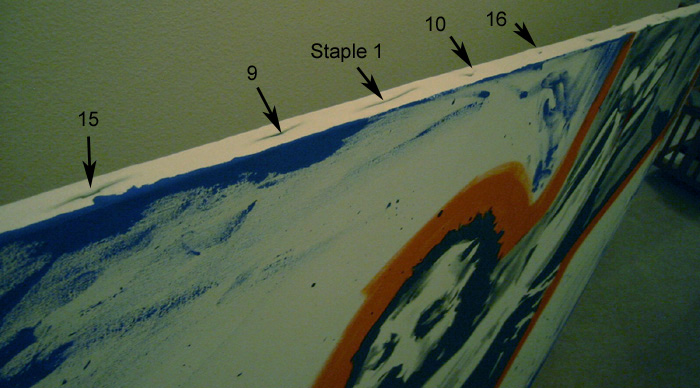
Here are the staples and a picture of what the finished corners should look like.
2. Lay the Finished Painting on a CLEAN Floor Face Down
Make sure the artwork is facing the floor.
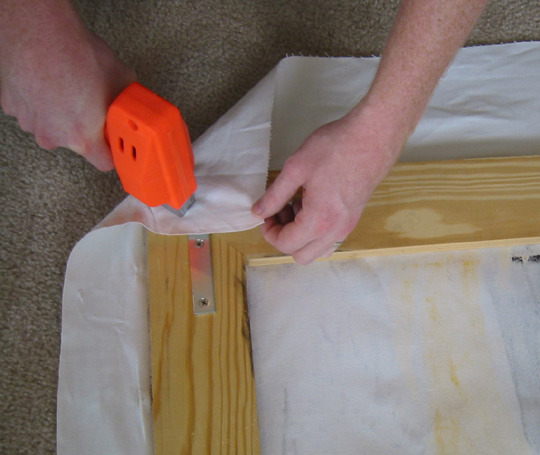
Pull the canvas over all 4 corners of the frame and loosely attach them with a staple one at a time. This is only to hold the canvas in place while you do the real work.
Attaching the 4 corners keep the canvas from flopping around while you work.
TIP!!!
- You will not want staples longer than 1/4″ because these need to be pulled out later!
- We use an Arrow power stapler (Electro-Matic). They cost about $20 bucks but are well worth the money if you can find one.
- Sometimes Home Depot has them. The one above is orange but the same model also comes in yellow.
3. Begin the stretching process
For this next step a buddy will come in handy.
If you do not have a buddy handy anyone you trust with a staple gun will do.
Tip! Do not tell them they are not your buddy as this may slow down the stretching process.
- Two chairs that you can stand will come in handy.
- Set the two chairs about 1 1/2 to 2 feet apart from each other.
- Hop up in one chair and have your helper hop up in the other with the staple gun.
- Now set the painting on its side between the two of you.
- Standing on the chairs gives you a little extra height so that you can properly staple the sides.
- You are going to start stapling in the middle of each side and work your way toward the edges.
- Sink the 1st staple and flip the frame 180 degrees. Pull the canvas pretty tight.
- Sink the next and flip it 90, then 180 again.
- You should now have a staple in the middle of each side so that there is a tight diamond shape stretched into the canvas.
- Next staple about 4″ on either side of the staple you just sunk. Flip 180 degrees… Repeat.
- With each staple you are going to pull the canvas both away from the center and away from its neighboring staple. (In a diagonal direction)
- Continue doing this until you get to the edges.
Tip!!! – Don’t be nervous, take your time.
You are using 1/4″ staples so if you make a mistake slowly and gently pull out the bad staples.
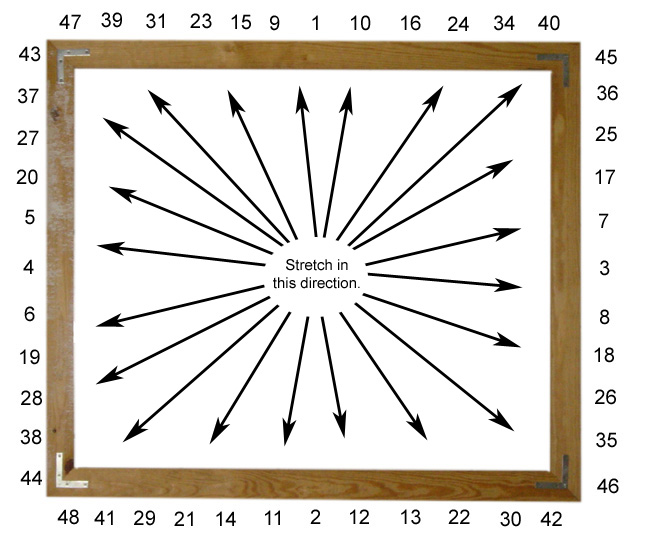
Shown above is a touch estimation of where the staples will go.
Once the four sides are completely stretched lay the painting artwork facing down again and attach the loose canvas to the back of the frame.
There are 100 different ways to do this, your goal is just to hide the loose canvas
from falling down or showing when you present the piece for viewing.
Congratulations!!! You are done stretching you new painting.
TIP!!! There are several ways to hang the artwork. I like to find a couple studs and sink 3″ nails in them. If you use a laser leveler than all you need to do is hang the artwork up on the nails, it will be level. Drive the nail so that about a half inch is left out of the drywall. The head of the nail should sit between the front of the frame and the back of the canvas.
Complete list of materials needed:
Frame
- (4 or 5) 6′ sticks of 1×4 Pine (the straighter the better)
Buy 1 extra if you think you might mess one up. - (4) 4″ Right angle corner brace and mounting screws.
Screws cannot be longer that 3/4 inch - (4) 3″ wood screws (buy a few extra)
- Miter Saw (You can use a hand saw, but I wouldn’t. If you don’t have a power miter saw borrow one)
- Drill w/ pilot hole bit and Phillips screw driver bit.
- Measuring tape
Stretching
- Stapler (if it’s a power stapler you will need an extension cord)
- Extension Cord (see above)
- (1) Box of Arrow T-50 1/4″ staples
- (2) Chairs to stand on
Note! If you are buying your own canvas I use Hancock Fabrics White 60″ Canvas Custom SKU # 715383.
If you want to seal the canvas to protect it from acidic paint and the elements buy Gesso from an art supply store and apply as many coats as you need.